
The February ’22 Release includes:
- Enhancements to Rich Text
- Updated Settings Dialog
- Ability to reset emojis
- Enhancements to JIRA Integration
- The ability for Group/Stacking/Layering of Sticky Notes
Rich Text
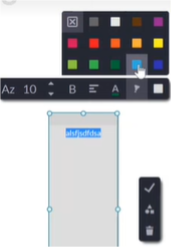
Based on client requests, we’re introducing Rich Text. To access this new feature, select your Sticky Note, click on your Hoylu toolbar, and follow the text prompts that best work for your preferred style.
Limitations: This version of Rich Text does not support links and bullet lists. It’s on our roadmap and coming soon!
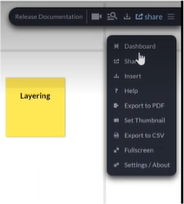
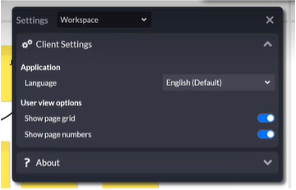
Updated Settings Dialog
In our effort to provide a cleaner user interface, we’re making several enhancements to the user experience. We have introduced a new Settings/About section in our main menu, pulling together four elements previously in the main menu: Language, Show Page Grid, Show Page Numbers, and About.
For our Pull Planning customers, as an Admin to the Pull Planning workspace, you can now toggle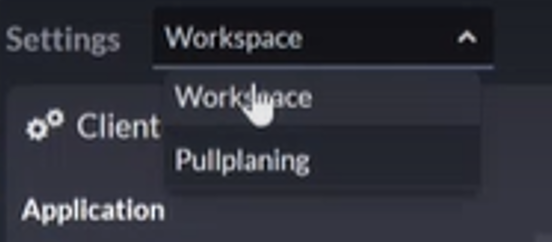 between Workspace and Pull Planning settings in this new Setting/About section.
 Reset Emojis
Now, on single or multiple Sticky Notes, you can go into the context menu and select reset emojis. This will remove any of the emojis associated with the Sticky Note but will not remove any text within the notes. This new feature will allow you to easily duplicate notes and remove previously added votes or emojis associated with the note.
Updates to JIRA
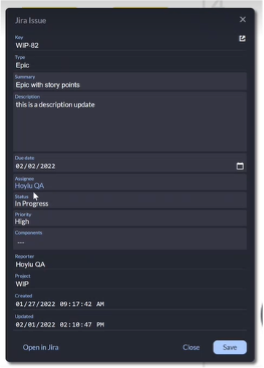
In our efforts to streamline the JIRA integration, we’ve made several bug fixes and introduced new fields that are now accessible to utilize. The new JIRA fields include Assignee, Priority, and Components.
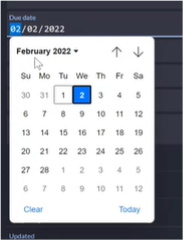 Additionally, suppose you need to update a Due Date in the JIRA ticket. In that case, the label will now immediately update on the ticket, rather than double-clicking the label or waiting for the JIRA integration to sync.
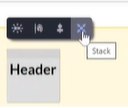
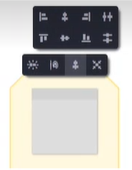 Grouping & Aligning Sticky Notes
In the February ’22 release, we’re launching three new features that allow for alignment, stacking, and layering of a group of sticky notes. This behavioral change will allow you to align multiple groups or single groups of sticky notes. To do so, select the sticky notes you’d like to group or align using the selection tool. Select the alignment icon and align top, bottom, left, or right.
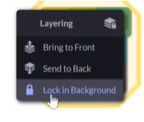
Stacking & Layering Sticky Notes
To stack a group of sticky notes, you’ll select the notes you’d like stacked using the selection tool. You’ll now see a Stack option, which pulls all the elements together. You’ll also be able to unstack the notes, which will put them back in the original order. The layering of the elements defines the order of the Stack. You can now go into the lock to background menu and select either bring to front, send to back, or lock-in background.
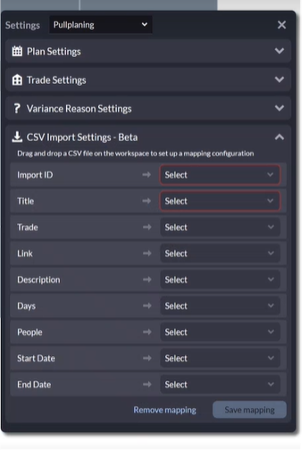
CSV Imports – Mapping
Our newest feature in this release is the imports of CSV files. In beta form, we will continue to build out multiple use cases and mappings. We’ll gradually be improving the mapping and parsing of the information.
You can take your selected CSV file and drag it into your Pull Planning workspace using the drag and drop feature. From there, a new settings box will automatically pop up. The first time you import a file, you’ll see a list of fields available, which include: Import ID, Title, Trade, Link, Description, Days, People, Start Date, and End Date.
Each field will display a drop-down box. When selecting the drop-down box, you’ll see which fields are available in the CSV file.
For the Import ID – this is a hidden field that is not exposed in the task. Import ID is currently a standing field, which is in preparation for future functionality of the CSV Imports. You will still want to map this to a task code (or whichever field you identify as a task within the CSV file).
You’ll continue to map out each of the areas as it relates to your CSV file.
 If selecting both a Start Date and End Date, the Days field, which calculates the duration length, will become inaccessible. If you leave the End Date out, the Days field will become accessible, and the End Datewill be inaccessible. The beta version has a limited set of supported date formats, so our recommendation for now, is to use the ISO format, YYYY-MM-DD.
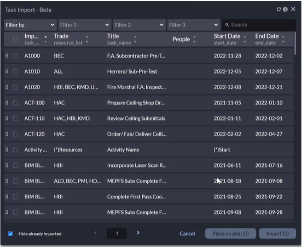
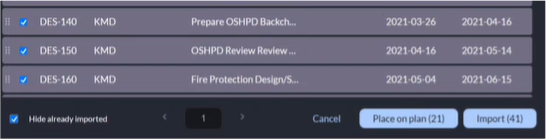
Once the initial mapping is set up, a Task Import box will pop up, allowing you to finetune what you’d like to import into the Pull Planning workspace. These can be filtered based on your selected columns.
CSV Import – Importing the Tasks
To import the tasks into your workspace, you have two options: drag and drop them into your workspace or select all your elements and select Place on Plan.
Selecting Place on Plan will automatically place the tasks into the appropriate swim lanes based on the start and end dates. This process will help in speeding up the conversions of plans with P6. By default, the Hide already imported is checked, so previously imported tasks will not display to avoid duplicate elements.
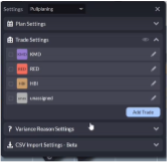 As the imports occur, the Trades will automatically be developed based on your mapping. However, Admins will be able to go into the main menu, Settings/About, and select Trade Settings. There you’ll be able to rename current trades or add additional trades. If Trades aren’t selected during the mapping process, you can manually update the Trades as you’re building out your plans.
If any issues would arise while importing or parsing the data, a red triangle will appear in the upper right corner of the Task Import box, “I” icon.

CSV Imports Beta Disclaimer and Feedback Request
As CSV Imports is in the beta phase, we will collect client feedback to improve use cases and increase our overall sample sizes to make the import process more robust. Please share your feedback with our Client Success team so we can continue to build, collaboratively, an innovative product that supports your business needs and streamlines processes.
Comments
0 comments
Article is closed for comments.